In the previous lecture, we discussed
column
efficiencies
and how to use them:
The overall column efficiency, $E_O$, is the ratio of
ideal trays
to
real trays
in the column.
The Murphree tray efficiency, $E_M$, is the
effectiveness of a
single real tray
when compared to a
ideal tray.
The Murphree point efficiency, $E_P$, is the
efficiency of a single point on a tray. This is only useful
when considering the flow on a tray in detail.
A constant Murphree tray efficiency is relatively easy
to use, forming an “effective”
VLE line
below the true
VLE line, which we called the
Murphree line.
The previous lectures example on using a Murphree tray
efficiency of
$E_M=0.5$.
But what is happening at the bottom of the stepping
when using the Murphree efficiency?
This is the first example of a case where we have
different efficiencies for different parts of the column.
The bottom stage is usually a
re-boiler stage,
and it is often assumed to have a Murphree efficiency of
$E_M=1.0$
!
This is because the
re-boilers actually generate
vapour from the liquid.
On trays, you are
contacting
vapour and liquid
phases to try to get them to come into equilibrium.
Generating vapour will typically be more effective at
achieving equilibrium concentrations.
A kettle-type re-boiler. The tube bundle is submerged in
a pool of the bottoms product, which is partially boiled to form
the vapour phase. The unboiled liquid flows over the top of a
weir to form the tower bottoms product.
So the re-boiler stage shouldn't use the
Murphree line, but should instead
go to the
VLE line
!
But we must be careful where we start our stepping
using the
murphree line. We must use whole
numbers of stages as they correspond to
real
trays.
If we start stepping from the top, we may
significantly over-design our column.
Starting the stepping from the bottom, we need 4 real trays
plus the re-boiler.
But starting the stepping from the top, we need an extra
real tray (5+1).
Its important to remember that the start point of
stepping can effect the final result
if the Murphree
tray/stage efficiencies vary.
Here we've seen the difference that the re-boiler
efficiency can make when using the Murphree tray efficiency.
How does having a ideal reboiler stage effect overall
efficiency calculations?
Let's double check how the overall efficiency works
when considering the re-boiler as an ideal stage.
We start off by calculating how many ideal stages are
required for the design.
Here we need around 2.6 ideal stages to perform the
separation.
But one ideal stage is provided by a re-boiler, so we
only need 1.6 ideal trays!
Assuming we have an overall efficiency of $E_O=0.4$,
this would give us
$1.6/0.4=4$
real stages and a reboiler
stage!
Contrast this to our previous design with a Murphree
tray efficiency of $E_M=0.5$.
Let's consider the distillation trays in a real
distillation column.
The tray's in a column will actually vary in type,
from random/structured packing, to sieve/valve/chimney trays.
They will vary as the viscosity of the column mixture
changes with concentration (compare the heavy components of
crude to the light paraffin's).
This means the efficiency will vary significantly in
the column.
The efficiency will also change due to the difference
in vapour and liquid flow rates in the stripping and
enrichment sections due to the addition of feed.
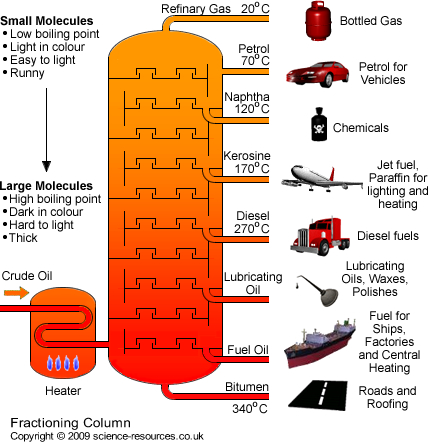
Crude column products and boiling temperatures.
The most complex case we will consider in this course
is that we have two Murphree efficiencies.
In the upper enrichment section, we might have a
higher efficiency due to the increased vapour flow-rates, and
lower liquid flow-rates resulting in longer liquid tray
residency times.
Let's do the previous Murphree example with two
different tray efficiencies…
The new Murphree diagram, where we have
$E_M=0.5$
in the
stripping section and
$E_M=0.75$
in the enrichment section. We
can start the stepping from the top but this results in the
lowest efficiency.
Don't worry about the discontinuity, just make sure the
feed tray is on the stripping line and extend it if required
(but the plotting here is always sufficient). Starting from the
top we greatly over-design the column thanks to the ideal
reboiler stage.
Stepping from the bottom and the over-design is
minimised. Remember, you can apply the Murphree line while
stepping to be more accurate and (possibly) save some time.
In summary, for efficiencies:
Remember that the re-boiler is nearly ideal, so it
should always contact the
VLE line.
You can have varying tray efficiencies in the
column, and the simplest example of this is when the
enrichment and stripping efficiencies are different.
Always start stepping from the bottom when using the
Murphree tray efficiency, as this uses the ideal re-boiler
stage to its maximum, and gives the minimum real-tray design.
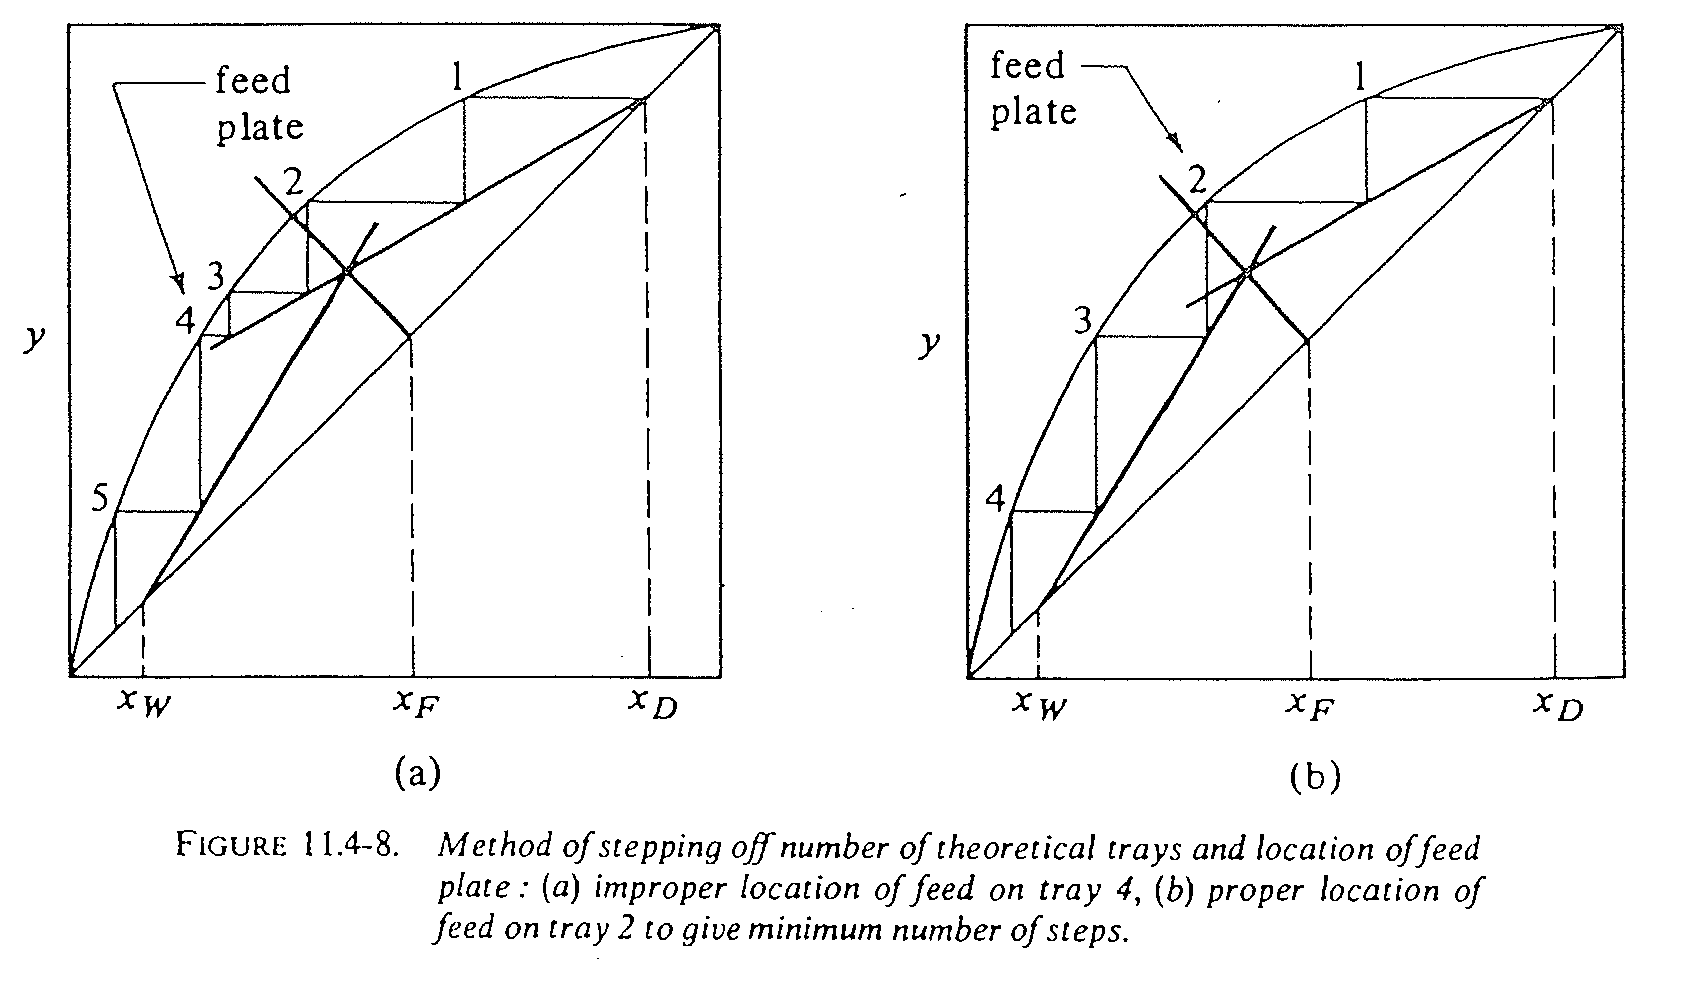
The last bit of ambiguity to clarify in distillation
design is
which tray is the feed tray?
The feed tray is defined as the tray below where the
feed enters the column.
The liquid falling down from the feed point will land
on this tray, and the feed vapour will join the rising vapour
from the tray.
Therefore,
the feed tray is the tray which
connects the two
operating lines.
The feed tray is tray 2. The vapour from the feed tray
(horizontal black line) connects to the enrichment
operating line
and the liquid from the tray
(vertical black line) falls onto the stripping
operating line.
Taken from pg. 656 of Transport Processes and Unit
Operations, 3rd Ed. An example of an improperly located feed
tray. This could occur if you recommissioned an old piece of
distillation equipment to perform a new separation.